Katchakid DIY Installation Instructions
Congratulations on choosing the Katchakid DIY pool safety net to protect your pool Spa or Pond. Getting this far is a smart decision for every parent or grandparent concerned about water safety. With a Katchakid nets, you can feel at ease knowing that there have been no reported drownings or near drownings when a net has been properly installed.
Getting Started
Watch the instructional DVD video and read the booklet thoroughly to familiarize yourself with the various components of your Katchakid pool net to know when they will be used in the installation process. Check that you have all the required tools.
The installation is more time consuming than it is technical for most people. for a medium sized pool it will take 2 people roughly 4-6 hours. Allow sufficient time and begin the installation process when there is plenty of daylight left. When working with electricity you will also need to watch the weather reports to make sure you choose a day when rain is not in the forecast.
The Katchakid net system is very versatile and can be installed on most pools, ponds, spas and water features. We would not let you get this far in the process if it was not possible to install the net on your pool. During our consultation process via email we required photographs of your pool, this allows us to determine if a net is suitable and if so which anchors and how many are to be supplied etc… if you did not send us images of the pool please go ahead and do so.
When you receive your net and are still unsure of any part of the installation process we are here to help. A Katchakid Technician can be reached during office hours; 9am - 5pm Monday through Friday on Toll Free 1-888-5-KATCHA or after these hours on cellular - 281 222 8305.
Katchakid Pool Net Included Hardware
Quantities vary by application and net size.
Katchakid Pool Net with Installed CTS system*
Anchors & Fasteners**
Roller Components***
A.S.T.M Labels
EZ-Ratchet & Pulley Rope*
Loose Braid
Start Disk
* small pond nets do not feature the CTS and do not require the use of the EZ ratchet
** you will receive a quantity of the anchor/fastener type discussed in the consultation.
*** rollers are only supplied with pool nets 15’ and larger
Pool Net Concepts:
Optimal net effectiveness is achieved with greater air space - water-to-net distance, your water level should ideally be at least 7" below pools edge.
Concrete decks must be at least 3" deep for secure anchor placement.
Ensure good condition of coping and pool surround.
For new pools, wait 5 days post-completion for concrete to set before installing Katchakid pool net.
Net openings should be small enough to block a 4.5" sphere under 40lbs force.
The distance between net anchors around the pools edge will be on average 30” apart and no roughly 8”-10” back from the edge of the pool. If it is not possible to have the anchors 8”-10” back from the pool’s edge then a rough formula of every inch closer or further to/from the edge of the pool distance between the anchors will be increased or reduced by 3” i.e. 9” from the edge = 27” apart or 12” back 33” apart.
If anchors can't be 10" from pool edge, adjust spacing accordingly.
Maintain net tension at 45-50lbs in both vertical and horizontal directions.
Katchakid invented the pool safety net system. With over 40 years in this field, this system offers a time tested product. We have many new customers that are purchasing net kits because they grew up with one.
These kits meet A.S.T.M code F1346-91 for manual safety covers which means any local requirements for pool barriers will be met when installing a Katchakid.
Required Tools and Equipment
Scissors
Hammer
Heavy Duty Hammer Drill *
3/4” Concrete Drill Bit
Soldering Iron (to be used as a hot knife)
Electrical Extension Cord with Ground Fault Interrupter
Clear PVC Glue for Roller Assembly Tape Measure
Epoxy or Cement (Maybe required for certain pool decking)
Water Pipe (If using a core drill)
* We recommend a heavy-duty hammer drill. For best possible results use a core drill with a diamond tipped drill bit. These drills can be rented on a daily basis from large hardware stores such as Home Depot. When using a core drill it is useful to use a wooden template to avoid the drill from sliding. A template can be produced from a 4” x 4” piece of wood with a %”in hole drilled through it. If using a core drill you will require a water pipe.
“Remember, a net is a supplementary pool safety aid.
The best pool safety concept is undivided and competent adult supervision.
A Katchakid net can never replace adult supervision, nor can it be a guarantee against drownings or other accidents.”
Step 1 - Planning
Read this following section before commencing your installation. Reading these instructions through will save a lot of time during the installation.
The Concept of Installation
All nets will come as squares and rectangles, we ask you to try visualize your pool in that square or rectangular shape. With that square/rectangle covering your pool/pond/spa try to keep all net lines as straight and square as possible while custom shaping the net to your pool.You will then trim the net to fit your pool, much the way a child cuts out a shape in a piece of paper.
Notes
When installing a pool net begin the installation process once you have decided on the exact position of the EZ-Off Roller, Start Button and EZ-Ratchet and CTS anchors.
As the nets are shipped as squares and rectangle the will come with four corners to the Katchakid net - two blunt corners are marked by yellow tags and two sharp corners marked by red tags. The positioning of the EZ-Off Roller and Start Button should be on the red-tagged "Sharp” corners of the netting mesh material.
The EZ-Off Roller ideally should be mounted on a corner position of the pool. An additional factor to consider when choosing the rollers location is that the roller needs approximately 3ft of open area for it to be anchored and operate freely.
For pool nets or large pond nets that utilize the Central Tension System (CTS) try to keep it located in the middle of the width of the pool with the largest area of open working space. The aim is to keep the tension even from all areas of the pool.
The Start Button indicates the first anchor to secure during replacement of the Katchakid. If the start button anchor is secured first when the net is pulled from the roller the Katchakid can easily be replaced in under 8 minutes. The Start Button is tied to the fastener / anchor on the diagonally opposite corner from the roller.
Your Central Tension System (CTS) is already threaded to face one certain direction.
Step 2 - Anchor Placement and Installation
Do Not Drill Yet!
Measure your pools length and width. Take 4 anchors and place one in the mid-point of each of these measurements; these anchors play an important role later on in the installation process. We will refer to these anchors as W1, W2, L1 and L2. (W= Width, L=Length)
Walk around your pool placing your anchors approx. 10”in away from the waters edge and no more than 30”in apart. Note - check your pool surround paving or coping for weak spots or cracks and try to avoid placing anchors in these spaces.
If it is not possible to have the fittings 10” from the pool’s edge then for every inch closer to the edge of the pool should be countered by reducing the distance of the fittings by 3”in i.e. 9” from the edge = 27” in apart.
At the corners of your pool make sure that the anchors are positioned at a 45-degree angle towards the water.
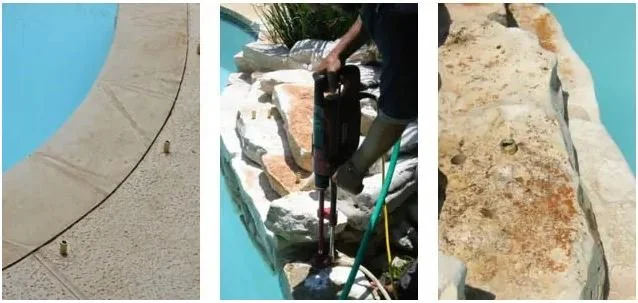
Once you are happy with the positioning of all the anchors you can begin to drill the recesses.
Using your hammer or core drill with a 3/4” in drill bit, drill a hole at least 1” in deep. Use the wooden template if desired to hold the drill in position. If you are using a core drill remove the core and wash the deck down with water after drilling to avoid staining.
If using a hammer drill sweep the pool surround clean.
With the keyhole of the anchor facing towards the water the anchors are now inserted. Place a piece of wood or similar over the anchor to prevent damage and hammer in the anchors until they are flush with the surface deck. With nylon anchors, it may be advisable to hold the anchor with a narrow pair of pliers so that the anchor does not twist during installation. Check that the anchor is inserted firmly, if not remedy with epoxy or cement.
Step 3 - Positioning and Securing The Katchakid
Remove the slim line net from the box. Lay the net flat on the ground and observe the net.
Look for -
The 2 red-tagged corners. These “sharp” corners as discussed in Step 1 must be the corners of the net used for the Start Disk and EZ-Roller and the 2 yellow -tagged corners that indicate the 2 blunt corners of the net.
The cross-marked with different colored cord running through the central mesh of the length and width.
Which side the CTS pulley rope exits.
Do Not Open The CTS: It must Be Closed.
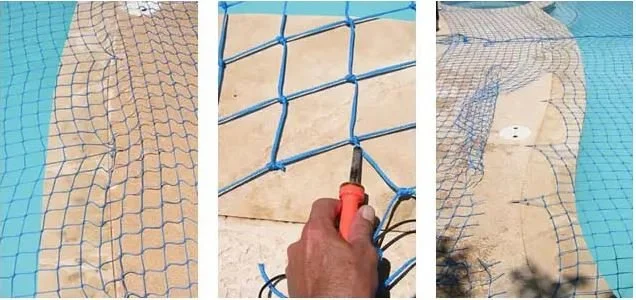
Taking the above 3 points into consideration the net is placed over the pool.
Spread the net evenly over the pool ensuring the CTS system is central and facing the desired operating position. Take care to stretch the net across the pool in both directions, keeping the mesh lines as straight as possible. Use the red and yellow -tagged corners of the net as your guide for the corners of the pool.
Once the net is spread uniformly over the pool, the location of the CTS is central and facing the correct direction and all mesh-running lines are as straight as possible note the cross of different colored cord running through the central mesh of the length and width. This cross is your guideline for keeping the net straight during fastener attachment to the anchors.
Take 4 fasteners. Starting at one of the length sides go to your anchor L1, catch the mesh square of the net closest to the length running line of different colored cord with the open fastener. Clip that fastener into anchor L1. Go to the opposite side of the pool and perform the same step with a fastener and attach to the anchor L2.
With the fastening of this L2 anchor the net will begin to be tensioned. Keeping the cross as straight as possible, perform the same action for the width W1 and W2 anchors with the width running line of different cord as your guideline. Pulling up the net one mesh at a time until the required tension is required
After these first 4 fasteners are attached to the L1, L2, W1 and W2 anchors check that the mesh squares and cross lines of different cord are running straight, the CTS is still central and the net is tensioned. If not adjust accordingly.
Now pull up the net one mesh square at a time and clip one by one each fastener into the remaining anchors gradually pulling up the net until the net is under tension. All fasteners should be perpendicular to the edge of the pool. If this is not the case move the fastener to a different mesh square. If you have steps and or ladders please read please see supplied print instructions before advancing any further with your installation.
Step 4 - Trimming the Katchakid
Once you are satisfied that the net is as straight and tight as possible, trim it along the natural curve with a soldering iron which cuts and seals the ends.
The lines between the cuts should be evenly scalloped into curves between each anchor and fastener. Be very careful not to cut the net too close to the pool’s edge.
Step 5 - Binding The Edges of The Katchakid
The CTS: must Still Be Closed
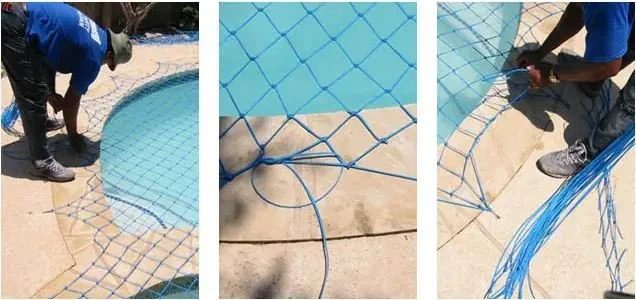
First Binding
This process increases the nets tension. The 4mm rope is used for binding the edges. Cut this rope into lengths 8 ft long to make the binding process more manageable. Starting at any one corner tie on a length of rope with a non slip knot to the fastener and going from the fastener weave the rope through each mesh square to the next fastener, wrap around the next fastener, pull tight and tie. Repeat this process of one full weave per Mesh Square from fastener to fastener until the whole pool has been bound. Join the lengths of edging braid as required, tying on each next length when the braid gets too short.
Try to ensure that the fasteners are still perpendicular to the pool’s edge and straight in their anchors.
Second Binding
This process is to close off the net and the 1st bind. It also gives the Katchakid’s edging strength, limiting normal wear and tear and preventing access under the net. The 2nd bind does not really effect the tension and is there for added strength.
The 2nd binding of the net requires knotting the rope at every mesh square’s knot around the edge of the pool. Again using the 8 ft lengths of rope tie the rope onto the first fastener. Lead the rope from the fastener into the 2nd mesh square, pull through and lead back into the first mesh square creating a loop around the knot pull the rope through the loop and pull tight creating a knot over the mesh squares knot.
The suggested satisfactory tension of the net should have both a minimum vertical and a horizontal pull of 45lbs - 50lbs. This can be ascertained with a simple spring loaded fishing scale.
Step 6 - Closing The Fasteners
Once the binding is completed close the fasteners by tapping them closed with a hammer. It could be required to place a block of wood under the fastener to prevent damage to the pool deck or paving
Finishing Up The Edges of The Katchakid
Once all the fasteners have been closed one should now go around the pool and finish the Katchakid’s edges by burning off the loose braid from the binding where you have added your 8 ft lengths together. This will prevent the binding from slipping and give your Katchakid a neat appearance. The yellow and red tagged corners and different colored cord cross guiding cords can now be removed if still present.
Step 7 - Setting The CTS System
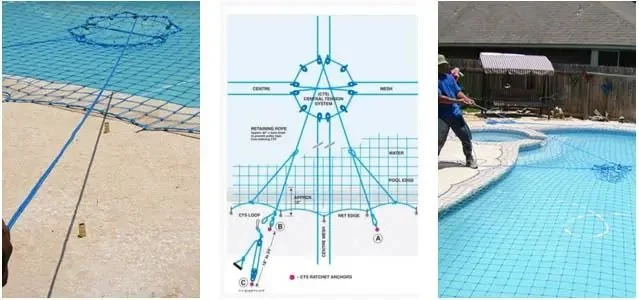
The Katchakid has now been fitted at the required tension. For the final steps to install the CTS and Ratchet anchors the CTS must be undone. To open the CTS take the Katchakid off the pool and un-do the tied central tensioning system pulley rope.
Now replace the Katchakid onto the pool taking care that the central tensioning rope does not unravel. Tying the pulley ropes to the mesh of the Katchakid can prevent this.
Go to the side of the pool that the CTS face’s towards. On this side 3 anchors must be installed; 2 for the CTS Pulley Ropes and 1 for the EZ-Ratchet Fitting.
Take hold of the tension cords and guiding them over pulleys 5 and 8 pull them over the paving in a straight line about 60 - 90 degrees apart.
Using your hammer or core drill with a 3/4” in drill bit, drill holes at least 1 %” in - 2”in deep for anchors A, B and C. Use the wooden template if desired to hold the drill in position. If you are using a core drill remove the core and wash the deck down with water after drilling to avoid staining. If using a hammer drill sweep the pool surround clean.
With the keyhole of the anchor facing the same angle as the pulley rope insert the anchors. Place a piece of wood or similar over the anchor to prevent damage and hammer in the anchor until it is flush with the surface deck.
Tie with a non-slip knot a fastener on to the end of the pulley rope that leads to anchor A. Insert fastener into anchor A.
Pull on the pulley rope that leads to anchors B & C so that the loose pulley rope from the beginning of the rope at anchor A is pulled through the CTS pulleys until the central tension pulleys are tightly closed. Tie on fastener at anchor B’s location. Make and tie an additional loop behind fastener B. This is the loop that connects the EZ-Ratchet clasp
If the net is still not tight enough and or the pulleys are not firmly closed any adjustment to the net’s tension must now be done on fastener / anchor A. This will avoid re-tying 2 series of knots.
The suggested satisfactory tension of the net should have both a minimum vertical and a horizontal pull of 45lbs - 50lbs. This can be ascertained with a simple spring loaded fishing scale
Step 8 - mounting The Katchakid Roller and Tying On The Start Disk
The roller is supplied partly assembled and will need to be completed. Clear PVC glue is required. Practice the final assembly of the roller, as the glue dries quickly.
Mount the roller in the required position on the corner that is marked by the red tag as pre-determined in your plan. The roller must be located on a corner of the net, or as close to a corner as possible. The position for your roller’s anchor should be approximately 3ft back from the pools edge.
Using your hammer or core drill with a %” in drill bit, drill a hole at least 1 %” in - 2”in deep. Use the wooden template if desired to hold the drill in position. If you are using a core drill remove the core and wash the deck down with water after drilling to avoid staining. If using a hammer drill sweep the pool surround clean.
With the keyhole of the anchor facing towards the water at a 45-degree angle insert the roller’s anchor. Place a piece of wood or similar over the anchor to prevent damage and hammer in the anchor until it is flush with the surface deck.
The roller’s fastener will clip into the rollers anchor to prevent the roller from sliding into the pool when winding in or out the net.
Tie the start button diagonally across the net from the roller on the remaining red-tagged corner. When removing the net the start disk will be the last point into the roller.
A.S.T.rn Labels. The following 3 labels are required in order for the Katchakid to meet the A.S.T.M F1346 - 91 code section 8.1 - 8.7.1 for manual safety covers.
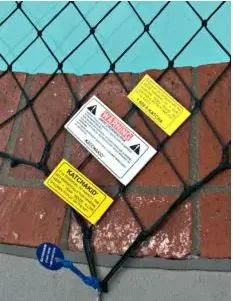
WARNING
REMOVE YOUR KATCHAKID COMPLETELY BEFORE USING POOL. NEVER LEAVE CHILDREN UNATTENDED NEAR POOL.
ALWAYS REPLACE YOUR KATCHAKID AFTER SWIMMING
Remember: Your pool net does not replace adult supervision. It is designed to act as a last line of defense.
The net is an additional safety feature for your pool.Children should never be left unattended.
Pool Protection can only be effective if used.
Your pool safety net is not a toy. Do not allow children or adults to jump or play on the net, this will cause rubbing or chaffing of the net.
Do not allow animals to chew on the net.
Your net is not warranted against destruction by animals. Keep the net away from sources of heat such as barbecues as it can melt.
Do not use your pool with the net partially opened. This creates a dangerous situation and should be avoided at all times.
Your pool is not properly secured until the net is in place and properly tension
Warranty
Company warrants only that its Net System and Components shall be free from defects in material, workmanship and title. Company's obligations set forth in section 7.2 below shall apply to failure to meet the foregoing warranties, except as to title, occurring within thirty-six (36) months after shipment by Company to the Customer, and which defects are brought to Company's attention in writing by Customer immediately upon discovery but not later than within the foregoing time periods. Defective items must be held for Company's inspection and returned to Company by Customer to the original shipment point upon Company's request. The manufacturer shall NOT BE held responsible for installation, labor, service, and freight. THE FOREGOING IS EXPRESSLY IN LIEU OF ALL OTHER WARRANTIES WHATSOEVER, WHETHER EXPRESS, IMPLIED OR STATUTORY, INCLUDING, WITHOUT LIMITATION, THE IMPLIED WARRANTIES OF MERCHANTABILITY AND FITNESS.
7.2 Upon Customer’s submission of a warranty claim as provided above, and its substantiation by Company, Company shall, at its option and as Customer’s sole remedy, either: (a) repair or replace the defective item; or (b) refund an equitable portion of the purchase price for the defective item. The foregoing is Company's only obligation and Customer’s exclusive remedy against Company for all claims, whether such claims are based on breach of contract, breach of warranty, tort or other theories. Company's warranty obligations shall not apply to any item which is not properly stored, assembled, installed, used, maintained, repaired by other than a certified technician of Company, or has been subjected to external heat sources (such as, but not limited to, pool heaters, ovens, and other cooking devices), misuse, accident, or acts of God. Modification of the Net System or Components by other than a certified technician of Company shall void Company’s warranty.